


Have you ever been in the right place at the wrong time? Every day, photographers visit locations and get less than ideal conditions. Whether it be a poor sunset, animals facing the wrong direction, a lack of light on your subject, or a variety of other challenges that face photographers, composite photography may be able to help.
What is Composite Photography?
Simply put, composite photography is when a photographer uses two or more different images to create one new image. Composite photography can wear many different hats, so no matter what kind of photographer you are, you may be able to benefit from creating a composite.
When most people hear composite, they think of replacing the boring blue sky in an image with a brilliant red and orange sunset. However, composites go far beyond a simple sky replacement. Photographers used composites for a variety of other things, including collages, focus stacks, fantasy scenes, focal length blends, and more!
The amount of compositing you wish to do on your own image is up to your own discretion. This guide will help you to figure out how to go about compositing your images. For the sake of simplicity, we will be talking about how to composite two photos from the same scene.
Why Use Composite Photography?
Photographers use composite photography for many different purposes. Some photographers aim to create scenes or capture things that would not be humanly possible. Other photographers wish to create better photography conditions at locations that they may never visit again. Some photographers even use composite photography to overcome the limitations of the camera. When using two or more photos from the same scene, usually the idea is to utilize an image with a nice sky and another image with a nice foreground.
How Do I Plan For a Composite Shoot?
If you wish to create a composite, you’ll want to have a tripod. This is because when the images are taken from the exact same spot, it is much easier to blend them together afterwards. If you take the images from different spots, it is possible to blend them but requires advanced techniques. Once on location, set up your tripod in the spot you’d like to shoot and be careful not to move or bump your tripod. Oftentimes, you’ll need to wait a while between shots if you are trying to capture an image of good light in the foreground, and another one of good light in the sky.
How Can I Use Composite Photography?
There are a variety of programs that will aid you in creating a composite image, but none as popular as Photoshop. Photoshop allows you to easily create any kind of composite that you’d like. Let’s look at a step by step guide to creating a composite in Photoshop.
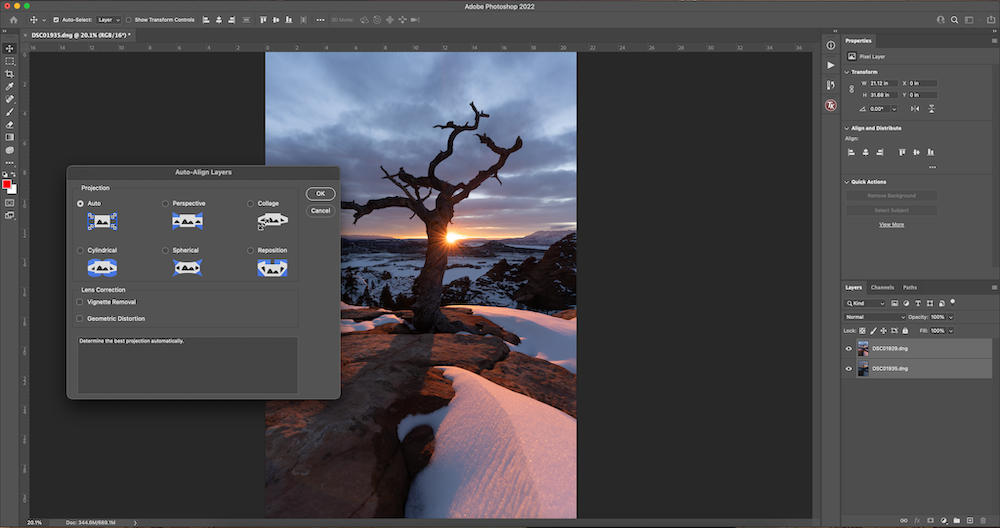
Step 1: Open the Images in Photoshop and Auto Align Layers
The first thing you need to do is to open up the images in Photoshop. Then, select both layers (Shift + Click on the layers) and go to Edit > Auto-Align Layers. Select Auto for the Projection option and hit Ok to let it load out. This will automatically align the two different images. Even if you shot on a tripod, it’s likely that the camera will still have slightly moved a pixel or two, so you want to be sure to align the images to make the compositing process as seamless as possible.
Step 2: Create a Layer Mask on the Top Layer
Select the top layer only, and click to add a layer mask. The layer mask button is on the bottom right hand corner of the screen, in between the fx button and the adjustment layers button (circle with a slash through it). A layer mask will appear next to the image. The layer mask appears totally white at the start, which means everything from the layer will show through. However, if we add some black, it will start to mask out some of the layer we are on, allowing the layer behind to show through.
Step 3: Grab the Brush Tool and Paint
Next, grab the brush tool. You can either select it in the menu bar on the left side, or hit B on your keyboard. Go to the menu bar on the top of the screen and adjust the brush settings. I like working with a Hardness of 0%, an Opacity of 100%, and Flow and Smoothing also at 100%. This will allow you to make a soft, feathered adjustment. Adjust the size of the brush how you see fit depending on the size of your image. Now, you’ll want to go back to the menu bar on the left side of the screen and select black as the color you will be painting with.
[“source=adorama”]